🎉 Introduction
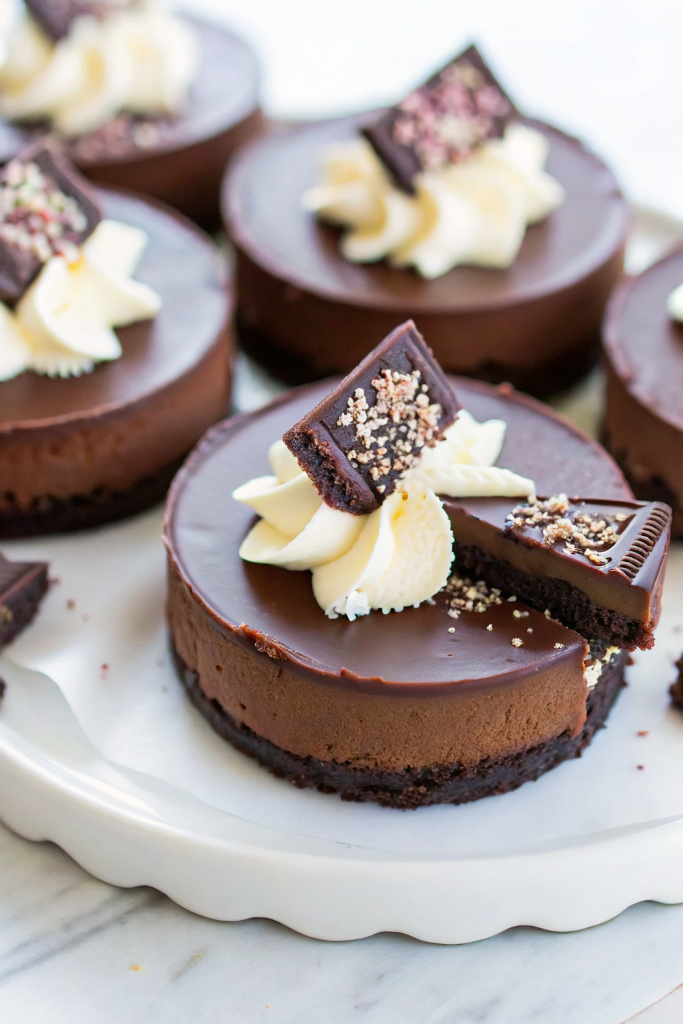
This Easy Chocolate Dessert is rich, silky, and guaranteed to satisfy every chocolate craving. With a crunchy Oreo crust and a smooth, velvety chocolate filling made from real semi-sweet chocolate and heavy cream, this dessert comes together with just a few ingredients and minimal effort. No complicated steps, no baking required, and no special skills needed — just melt, whip, chill, and enjoy. Whether you need a quick holiday dessert, a last-minute dinner treat, or something indulgent for chocolate lovers, this recipe delivers deep chocolate flavor, creamy texture, and pure comfort.
🛒 Ingredients
For the Oreo Crust
- 20 Oreo cookies
- 6 tablespoons Butter, melted
For the Chocolate Filling
- 12 oz Semi-sweet chocolate
- 12 oz Heavy cream
🧰 Equipment Needed
- Food processor or rolling pin
- Mixing bowls
- Rubber spatula
- 8×8 pan, pie dish, or serving cups
- Microwave-safe bowl or saucepan
- Whisk
- Refrigerator space
- Cutting board (if chopping chocolate)
👩🍳 Directions (Form-Steps Style)
🔹 PART 1 — MAKE THE CRUST
Step 1 — Prepare the Oreos
Option A — Food Processor
- Add Oreos (cream included).
- Pulse until finely crushed.
Option B — No Processor
- Place Oreos in a zip bag.
- Crush using a rolling pin until crumbs form.
Step 2 — Combine with Butter
- Pour melted butter over the Oreo crumbs.
- Mix until crumbs resemble wet sand.
This creates a rich, crunchy chocolate crust.
Step 3 — Press the Crust
- Transfer mixture to your dish or cups.
- Press firmly to create an even base.
- Chill while preparing the filling.
🔹 PART 2 — MAKE THE CHOCOLATE FILLING
Step 4 — Heat the Heavy Cream
Option A — Microwave
- Microwave cream until hot but NOT boiling.
Option B — Stovetop
- Warm cream in a small pot over medium-low.
Hot cream will melt the chocolate without scorching it.
Step 5 — Melt the Chocolate
- Place semi-sweet chocolate in a bowl.
- Pour hot cream over chocolate.
- Let sit 2–3 minutes.
- Whisk gently until smooth and glossy.
This creates a silky chocolate ganache.
Step 6 — Cool Slightly
- Let mixture sit 5–10 minutes.
- Slight cooling helps it thicken before pouring.
🔹 PART 3 — ASSEMBLE THE DESSERT
Step 7 — Pour Filling Over Crust
- Pour the chocolate ganache onto the chilled Oreo base.
- Smooth the top with a spatula.
Step 8 — Chill Until Set
- Refrigerate 2–3 hours until firm and sliceable.
- For faster setting, place in freezer 35 minutes.
Step 9 — Slice or Scoop
- Slice into squares, or scoop into bowls.
- Serve chilled for best texture.
🍽️ Servings & Timing
- Makes: 9–12 servings
- Prep Time: 10 minutes
- Chill Time: 2–3 hours
- Total Time: ~3 hours
🧊 Storage
Refrigerator
- Keeps perfectly 4–5 days in airtight container.
Freezer
- Freeze up to 2 months.
- Thaw in fridge before serving.
🥄 Variations
1. Triple Chocolate Dessert
Mix milk chocolate with semi-sweet for extra creaminess.
2. White Chocolate Layered Dessert
Add a second white chocolate–ganache layer.
3. Mocha Chocolate Dessert
Add 1 teaspoon instant espresso powder to the cream.
4. Oreo Crunch Topping
Sprinkle crushed Oreo pieces on top before chilling.
5. Chocolate Mousse Style
Fold whipped cream into the ganache for a lighter texture.
6. Candy Cane Christmas Version
Add crushed peppermint on top.
❓ 10 FAQs
1. Why did my chocolate seize?
Water touched the chocolate — always ensure dry utensils.
2. Why is the filling too soft?
Needs more chilling time — refrigerate longer.
3. Can I use milk chocolate?
Yes, but dessert will be sweeter and softer.
4. Can I add toppings?
Whipped cream, raspberries, shaved chocolate, sprinkles — all great.
5. Can kids eat this?
Absolutely — alcohol-free and safe.
6. Can I use a graham cracker crust?
Yes — but Oreo crust gives deeper chocolate flavor.
7. Can I prepare it in cups?
Yes — beautiful for individual servings.
8. Does it need baking?
No — completely no-bake.
9. Can I use heavy whipping cream?
Yes — same product.
10. Why is my crust crumbly?
Not enough butter — add 1 extra tablespoon if needed.
🏁 Conclusion
This Easy Chocolate Dessert is the perfect blend of creamy chocolate richness and crunchy Oreo texture. With only four simple ingredients and absolutely no baking, it’s a dessert that delivers maximum flavor with minimum effort. Whether it’s for holidays, family gatherings, special occasions, or a last-minute sweet craving, this dessert is guaranteed to impress. Each bite is smooth, indulgent, chocolatey, and incredibly satisfying — a true must-try for every chocolate lover.
Easy Chocolate Dessert – Rich, Creamy & Impossible to Resist
Ingredients
Equipment
Method
- 🔹 PART 1 — MAKE THE CRUST
- Option A — Food Processor
- Add Oreos (cream included).
- Pulse until finely crushed.
- Option B — No Processor
- Place Oreos in a zip bag.
- Crush using a rolling pin until crumbs form.
- Pour melted butter over the Oreo crumbs.
- Mix until crumbs resemble wet sand.
- This creates a rich, crunchy chocolate crust.
- Transfer mixture to your dish or cups.
- Press firmly to create an even base.
- Chill while preparing the filling.
- 🔹 PART 2 — MAKE THE CHOCOLATE FILLING
- Option A — Microwave
- Microwave cream until hot but NOT boiling.
- Option B — Stovetop
- Warm cream in a small pot over medium-low.
- Hot cream will melt the chocolate without scorching it.
- Place semi-sweet chocolate in a bowl.
- Pour hot cream over chocolate.
- Let sit 2–3 minutes.
- Whisk gently until smooth and glossy.
- This creates a silky chocolate ganache.
- Let mixture sit 5–10 minutes.
- Slight cooling helps it thicken before pouring.
- 🔹 PART 3 — ASSEMBLE THE DESSERT
- Pour the chocolate ganache onto the chilled Oreo base.
- Smooth the top with a spatula.
- Refrigerate 2–3 hours until firm and sliceable.
- For faster setting, place in freezer 35 minutes.
- Slice into squares, or scoop into bowls.
- Serve chilled for best texture.
Notes
Refrigerator Keeps perfectly 4–5 days in airtight container. Freezer Freeze up to 2 months. Thaw in fridge before serving. 🥄 Variations
1. Triple Chocolate Dessert Mix milk chocolate with semi-sweet for extra creaminess. 2. White Chocolate Layered Dessert Add a second white chocolate–ganache layer. 3. Mocha Chocolate Dessert Add 1 teaspoon instant espresso powder to the cream. 4. Oreo Crunch Topping Sprinkle crushed Oreo pieces on top before chilling. 5. Chocolate Mousse Style Fold whipped cream into the ganache for a lighter texture. 6. Candy Cane Christmas Version Add crushed peppermint on top. ❓ 10 FAQs
1. Why did my chocolate seize? Water touched the chocolate — always ensure dry utensils. 2. Why is the filling too soft? Needs more chilling time — refrigerate longer. 3. Can I use milk chocolate? Yes, but dessert will be sweeter and softer. 4. Can I add toppings? Whipped cream, raspberries, shaved chocolate, sprinkles — all great. 5. Can kids eat this? Absolutely — alcohol-free and safe. 6. Can I use a graham cracker crust? Yes — but Oreo crust gives deeper chocolate flavor. 7. Can I prepare it in cups? Yes — beautiful for individual servings. 8. Does it need baking? No — completely no-bake. 9. Can I use heavy whipping cream? Yes — same product. 10. Why is my crust crumbly? Not enough butter — add 1 extra tablespoon if needed. 🏁 Conclusion This Easy Chocolate Dessert is the perfect blend of creamy chocolate richness and crunchy Oreo texture. With only four simple ingredients and absolutely no baking, it’s a dessert that delivers maximum flavor with minimum effort. Whether it’s for holidays, family gatherings, special occasions, or a last-minute sweet craving, this dessert is guaranteed to impress. Each bite is smooth, indulgent, chocolatey, and incredibly satisfying — a true must-try for every chocolate lover.