
🎉 Introduction
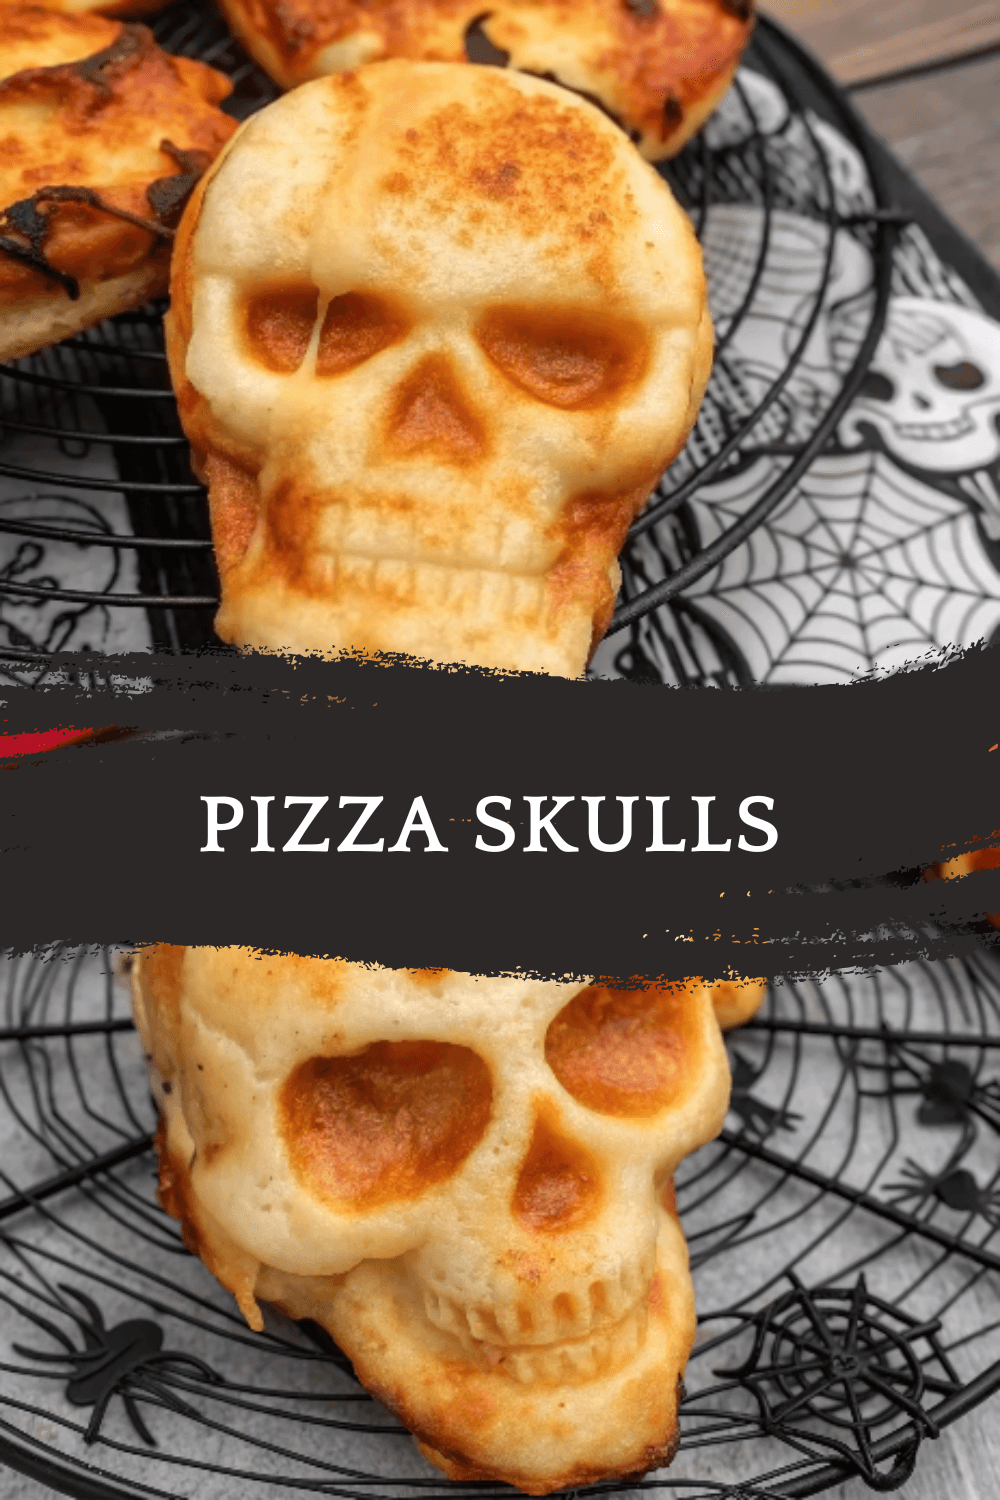
If you’re looking for a snack that’s as spooky as it is delicious, pizza skulls are the ultimate Halloween party food. Imagine a golden-brown skull-shaped pastry filled with gooey cheese, savory sauce, and your favorite pizza toppings. They’re creepy, fun, and guaranteed to wow kids and adults alike.
What makes pizza skulls so exciting is their versatility—you can customize them with different fillings, keep them simple with cheese and sauce, or pack them with vegetables and chicken for a hearty bite. They’re not just snacks; they double as a party activity since kids love helping stuff and seal the dough.
Served hot with marinara dipping sauce, pizza skulls are the star of any spooky table. Whether you’re hosting a Halloween party, a themed movie night, or just want a festive twist on pizza night, these little skulls are sure to impress.
🧰 Equipment Needed
To make pizza skulls, you’ll need:
- Skull-shaped silicone baking mold (Halloween style)
- Mixing bowls
- Spoon for filling
- Pastry brush
- Baking sheet (optional, for support under the mold)
- Cooling rack
🛒 Ingredients
For the dough and filling:
- 1 can refrigerated pizza dough (or homemade dough)
- 1 cup pizza sauce
- 1 ½ cups shredded mozzarella cheese
- 1 cup cooked chicken, beef, or turkey sausage (chopped small)
- ½ cup diced bell peppers (optional)
- ½ cup sliced mushrooms (optional)
- ½ teaspoon garlic powder
- ½ teaspoon dried oregano
- Salt and black pepper, to taste
For the finish:
- 1 egg (for egg wash)
- Extra pizza sauce, for dipping
👩🍳 Directions (Step-by-Step)
Step 1: Prepare the oven and mold
- Preheat oven to 375°F (190°C).
- Lightly grease your skull-shaped mold with cooking spray or butter.
Step 2: Roll out the dough
- On a lightly floured surface, roll pizza dough into a thin rectangle.
- Cut into pieces large enough to fit inside each skull cavity with some overhang.
Step 3: Line the mold
- Press one piece of dough into each skull cavity, leaving dough hanging over the edges for sealing later.
Step 4: Add fillings
- Spoon 1–2 teaspoons of pizza sauce into the bottom.
- Sprinkle in mozzarella cheese.
- Add chicken, sausage, or vegetables as desired.
- Top with a little more cheese.
Step 5: Seal the skulls
- Place another piece of dough on top of the filling.
- Pinch edges together with the overhanging dough to fully seal.
Step 6: Apply egg wash
- Beat 1 egg and brush the tops of each skull with egg wash for a golden finish.
Step 7: Bake
- Place the mold on a baking sheet for stability.
- Bake for 18–22 minutes, or until the dough is golden brown and cooked through.
Step 8: Cool and serve
- Let pizza skulls cool in the mold for 5 minutes before carefully removing.
- Serve warm with extra pizza sauce for dipping.
🍽️ Servings & Timing
- Servings: 6–8 pizza skulls (depending on mold size)
- Prep Time: 15 minutes
- Cook Time: 20 minutes
- Total Time: 35 minutes
🧊 Storage & Reheating
- Store cooled pizza skulls in an airtight container in the fridge for up to 3 days.
- Freeze baked skulls for up to 1 month (wrap individually in foil or plastic wrap).
- Reheat in the oven at 350°F (175°C) for 10 minutes until warmed through.
🥄 Variations
- Cheesy Skulls – Keep it simple with just mozzarella and sauce.
- Veggie Skulls – Fill with mushrooms, peppers, and spinach.
- BBQ Chicken Skulls – Replace pizza sauce with BBQ sauce and add shredded chicken.
- Breakfast Skulls – Use scrambled eggs, cheese, and cooked chicken sausage.
- Spicy Skulls – Add jalapeños or hot sauce for a kick.
❓ 10 FAQs
- Do I need a special mold for pizza skulls?
Yes, a skull-shaped silicone mold works best for the design. - Can I use homemade dough?
Absolutely—store-bought or homemade both work. - Can I make these ahead of time?
Yes, assemble skulls and refrigerate unbaked for up to 24 hours. Bake before serving. - What fillings work best?
Cheese, sauce, cooked meats, and small-cut veggies. Avoid watery vegetables. - How do I keep the dough from sticking?
Grease the mold generously with spray or butter. - Can I use puff pastry instead of pizza dough?
Yes, puff pastry makes flakier skulls, but bake time may vary. - Can I make these vegetarian?
Yes—fill with cheese, mushrooms, peppers, and spinach. - Do kids like these?
Definitely! They’re fun, handheld, and spooky enough for Halloween parties. - How do I make them extra spooky?
Brush with garlic butter and sprinkle with black sesame seeds before baking. - Can I serve them cold?
They’re best served warm, but they can be eaten at room temperature.
🏁 Conclusion
Pizza skulls are the ultimate Halloween snack—spooky on the outside, cheesy and delicious on the inside. They’re easy to make, customizable with endless filling options, and guaranteed to be the hit of any kids’ party. Whether you keep them simple with cheese or pack them full of toppings, these skulls will add both fun and flavor to your Halloween table. Serve them with dipping sauce, watch the kids’ eyes light up, and enjoy the spooky season one bite at a time!
Pizza Skulls – Spooky, Cheesy, and Perfect for Halloween
Ingredients
✨ Kitchen Essentials You’ll Love
Quick picks I trust for better results, faster prep, and easier cleanup.
-
🍳View ↗
Lodge Seasoned Cast Iron Skillet
-
⚡View ↗
Instant Pot Duo Plus 9-in-1 Electric
-
🔥View ↗
CHEFMAN Digital Air Fryer XL 10L
Disclosure: As an Amazon Associate, I earn from qualifying purchases at no extra cost to you.
Equipment
Method
- Preheat oven to 375°F (190°C).
- Lightly grease your skull-shaped mold with cooking spray or butter.
- On a lightly floured surface, roll pizza dough into a thin rectangle.
- Cut into pieces large enough to fit inside each skull cavity with some overhang.
- Press one piece of dough into each skull cavity, leaving dough hanging over the edges for sealing later.
- Spoon 1–2 teaspoons of pizza sauce into the bottom.
- Sprinkle in mozzarella cheese.
- Add chicken, sausage, or vegetables as desired.
- Top with a little more cheese.
- Place another piece of dough on top of the filling.
- Pinch edges together with the overhanging dough to fully seal.
- Beat 1 egg and brush the tops of each skull with egg wash for a golden finish.
- Place the mold on a baking sheet for stability.
- Bake for 18–22 minutes, or until the dough is golden brown and cooked through.
- Let pizza skulls cool in the mold for 5 minutes before carefully removing.
- Serve warm with extra pizza sauce for dipping.
Notes
Yes, a skull-shaped silicone mold works best for the design. Can I use homemade dough?
Absolutely—store-bought or homemade both work. Can I make these ahead of time?
Yes, assemble skulls and refrigerate unbaked for up to 24 hours. Bake before serving. What fillings work best?
Cheese, sauce, cooked meats, and small-cut veggies. Avoid watery vegetables. How do I keep the dough from sticking?
Grease the mold generously with spray or butter. Can I use puff pastry instead of pizza dough?
Yes, puff pastry makes flakier skulls, but bake time may vary. Can I make these vegetarian?
Yes—fill with cheese, mushrooms, peppers, and spinach. Do kids like these?
Definitely! They’re fun, handheld, and spooky enough for Halloween parties. How do I make them extra spooky?
Brush with garlic butter and sprinkle with black sesame seeds before baking. Can I serve them cold?
They’re best served warm, but they can be eaten at room temperature. 🏁 Conclusion Pizza skulls are the ultimate Halloween snack—spooky on the outside, cheesy and delicious on the inside. They’re easy to make, customizable with endless filling options, and guaranteed to be the hit of any kids’ party. Whether you keep them simple with cheese or pack them full of toppings, these skulls will add both fun and flavor to your Halloween table. Serve them with dipping sauce, watch the kids’ eyes light up, and enjoy the spooky season one bite at a time!


Leave a Reply