🎉 Introduction
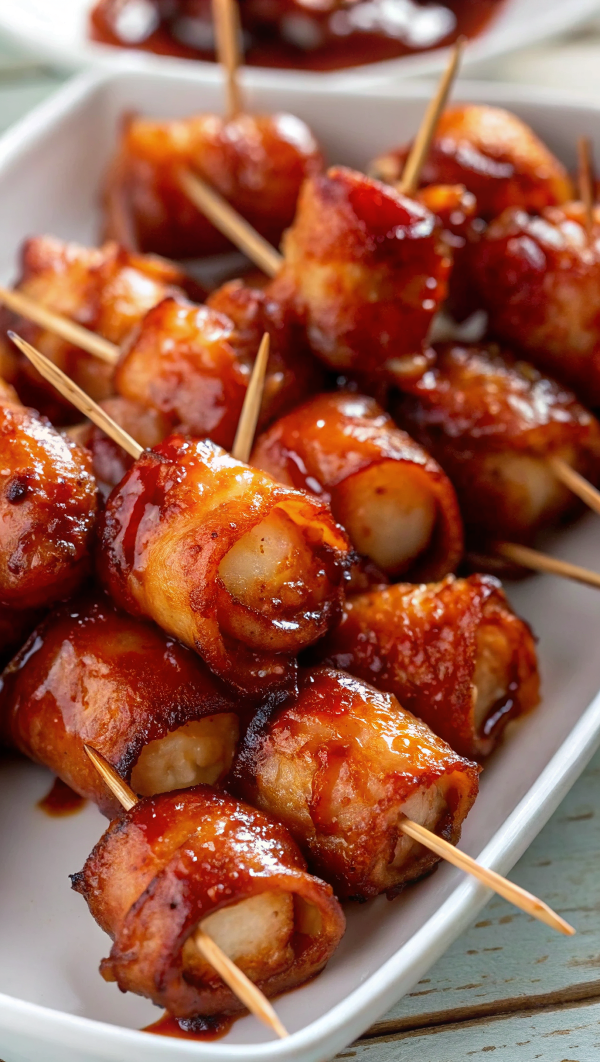
Wrapped water chestnuts are a classic party appetizer known for their irresistible contrast of textures—crispy on the outside and perfectly crunchy on the inside. This version keeps all the bold, savory flavor people love while using thin chicken slices instead of traditional alternatives, making it satisfying, flavorful, and widely enjoyable.
Water chestnuts are naturally crisp and mild, which makes them the perfect base for wrapping and glazing. When paired with a sweet-and-savory sauce and baked until golden, they become a bite-sized appetizer that disappears fast at gatherings, holidays, and game nights.
This recipe is easy, reliable, and ideal for preparing ahead of time. With simple ingredients and clear steps, these wrapped water chestnuts are guaranteed to become a go-to favorite.
🧰 Equipment Needed
- Baking sheet
- Parchment paper or foil
- Small saucepan
- Mixing bowl
- Tongs
- Toothpicks
- Measuring cups and spoons
- Oven
🛒 Ingredients
- 2 cans whole water chestnuts, drained
- Thin chicken breast slices (cut into strips)
- ½ cup brown sugar
- ½ cup soy sauce
- Toothpicks
These ingredients create sweet, savory, and perfectly crisp wrapped water chestnuts.
👩🍳 Directions
Step 1:
Preheat the oven to 190°C (375°F). Line a baking sheet with parchment paper or foil.
Step 2:
Drain the water chestnuts thoroughly and pat them dry with paper towels.
Step 3:
Cut the chicken breast into thin strips long enough to wrap around each water chestnut.
Step 4:
Wrap one strip of chicken tightly around each water chestnut.
Step 5:
Secure each wrapped chestnut with a toothpick and place it seam-side down on the prepared baking sheet.
Step 6:
In a small saucepan, combine the brown sugar and soy sauce.
Step 7:
Heat the mixture over medium heat, stirring until the sugar is fully dissolved and the sauce is smooth.
Step 8:
Remove the sauce from heat and let it cool slightly.
Step 9:
Spoon or brush the sauce generously over each wrapped water chestnut.
Step 10:
Bake uncovered for 35–40 minutes, turning once halfway through and brushing with extra sauce.
Step 11:
Remove from the oven once the chicken is fully cooked and caramelized.
Step 12:
Let rest for 5 minutes before serving.
🍽️ Servings & Timing
- Servings: 24–30 pieces
- Preparation Time: 15 minutes
- Cooking Time: 40 minutes
- Total Time: 55 minutes
Perfect for parties, holiday platters, and appetizer spreads.
🧊 Storage & Reheating
- Refrigerator:
Store leftovers in an airtight container for up to 3 days. - Freezer:
Freeze cooked pieces for up to 1 month. - Reheating:
Reheat in the oven or air fryer until warmed through and slightly crisp.
🥄 Variations
- Extra sweet: Add a little more brown sugar to the sauce
- Spicy kick: Add chili flakes to the glaze
- Crispier finish: Broil briefly at the end
- Lighter option: Use low-sodium soy sauce
- Party-size: Make smaller pieces for bite-sized servings
These variations keep the heart of wrapped water chestnuts while adding flexibility.
❓ 10 FAQs
- Why use water chestnuts?
They stay crunchy even after baking. - Can I prepare these ahead of time?
Yes, assemble and refrigerate before baking. - Do I need toothpicks?
Yes, they keep everything secure while cooking. - Can kids eat these?
Yes, they’re mildly sweet and savory. - How do I know the chicken is cooked?
It should be golden and fully firm. - Can I double the recipe?
Yes, just use multiple baking sheets. - Do I need to flip them?
Turning once ensures even caramelization. - What makes the sauce thick?
Heating dissolves sugar and creates a glaze. - Can I bake on foil?
Yes, lightly grease it to prevent sticking. - Are these good served cold?
They’re best served warm.
🏁 Conclusion
These easy wrapped water chestnuts deliver everything a great appetizer should: crunch, flavor, and irresistible sweetness in every bite. With simple preparation and a bold glaze, they’re perfect for entertaining or anytime you want a guaranteed crowd-pleaser. One tray is never enough.
Easy Wrapped Water Chestnuts – Crispy, Savory, and Crowd-Pleasing
Ingredients
Equipment
Method
- Preheat the oven to 190°C (375°F). Line a baking sheet with parchment paper or foil.
- Drain the water chestnuts thoroughly and pat them dry with paper towels.
- Cut the chicken breast into thin strips long enough to wrap around each water chestnut.
- Wrap one strip of chicken tightly around each water chestnut.
- Secure each wrapped chestnut with a toothpick and place it seam-side down on the prepared baking sheet.
- In a small saucepan, combine the brown sugar and soy sauce.
- Heat the mixture over medium heat, stirring until the sugar is fully dissolved and the sauce is smooth.
- Remove the sauce from heat and let it cool slightly.
- Spoon or brush the sauce generously over each wrapped water chestnut.
- Bake uncovered for 35–40 minutes, turning once halfway through and brushing with extra sauce.
- Remove from the oven once the chicken is fully cooked and caramelized.
- Let rest for 5 minutes before serving.
Notes
Store leftovers in an airtight container for up to 3 days. Freezer:
Freeze cooked pieces for up to 1 month. Reheating:
Reheat in the oven or air fryer until warmed through and slightly crisp. 🥄 Variations Extra sweet: Add a little more brown sugar to the sauce Spicy kick: Add chili flakes to the glaze Crispier finish: Broil briefly at the end Lighter option: Use low-sodium soy sauce Party-size: Make smaller pieces for bite-sized servings These variations keep the heart of wrapped water chestnuts while adding flexibility. ❓ 10 FAQs Why use water chestnuts?
They stay crunchy even after baking. Can I prepare these ahead of time?
Yes, assemble and refrigerate before baking. Do I need toothpicks?
Yes, they keep everything secure while cooking. Can kids eat these?
Yes, they’re mildly sweet and savory. How do I know the chicken is cooked?
It should be golden and fully firm. Can I double the recipe?
Yes, just use multiple baking sheets. Do I need to flip them?
Turning once ensures even caramelization. What makes the sauce thick?
Heating dissolves sugar and creates a glaze. Can I bake on foil?
Yes, lightly grease it to prevent sticking. Are these good served cold?
They’re best served warm. 🏁 Conclusion These easy wrapped water chestnuts deliver everything a great appetizer should: crunch, flavor, and irresistible sweetness in every bite. With simple preparation and a bold glaze, they’re perfect for entertaining or anytime you want a guaranteed crowd-pleaser. One tray is never enough.